
Chinese Bronze Vessels
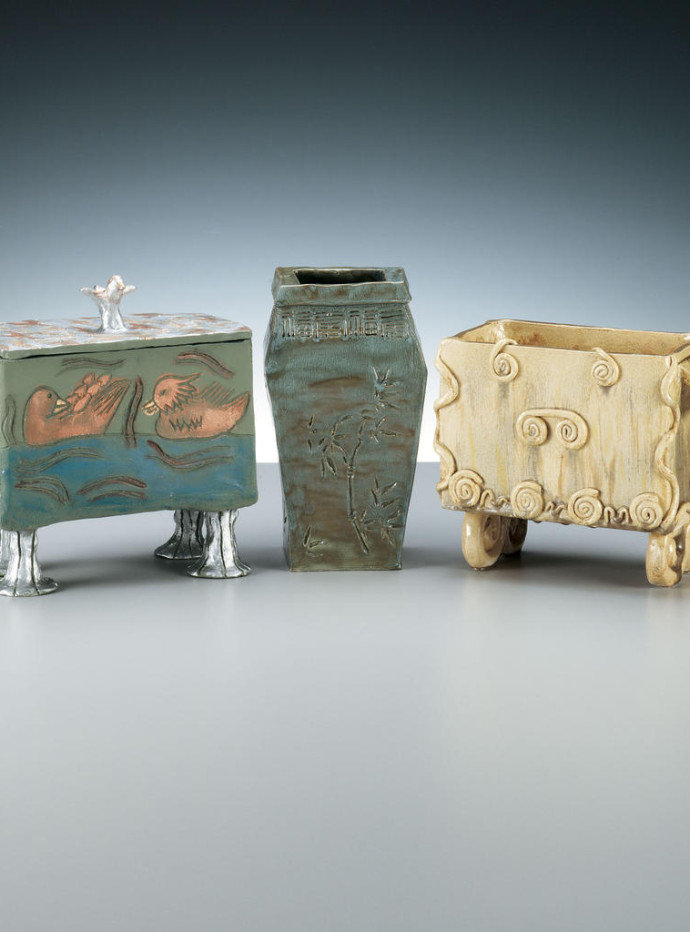
The Chinese Bronze Age lasted from the 16th Century B.C. to approximately the beginning of the modern era. During this brilliant chapter in Chinese history, the Chinese of the Shang and Early Chou Dynasties used bronze vessels as part of the burial process and ancestor worship. They believed that their deceased relatives did not suffer death as we know it, but went to another, very similar world where they lived forever. The deceased needed food, clothing, and household utensils, and so these things were buried with them. Bronze vessels were used to hold food and wine as an integral part of the funeral ceremony, because these vessels would last forever. In this lesson, high school students learn the art of recreating Chinese Bronze Vessels using clay, specialized glazes, and Rub ‘n Buff®.
Supplies List
- Low Fire Clay
- (LT) Textured Alligator Glazes
- Rub N' Buff
- Hardwood Modeling Tools
- Texture Rollers
- Hardwood Paddle
- Hardwood Rolling Pin

Background and Preparation
Present an overview of the history of Chinese Bronze Vessels with various examples. In addition to showing students photographs, plan a trip to the local art museum to see actual examples of these vessels. Explain that the students are making a vessel that is designed to hold something of value. The vessels in this lesson are based loosely on the Chinese Ting vessels of the Shang Dynasty. The vessels were used in various ceremonies, especially funerals. The designs were based on animal and geometric forms. Some designs show a symmetrical human mask. Late Shang designers used zoomorphic motifs with quadrupeds, reptiles, birds, and insects. Emphasize that the students will be making “faux” Chinese Bronze Vessels and explore what techniques and materials were used to create the originals. Describe the techniques and materials used in this lesson plan—coil and slab building, carving, and finishing techniques. Show students examples of pieces created using these methods.
Sketch
After looking at pictures of vessels and discussing the history, students should draw the shape and design of the vessel they want to create. Vessels should be approximately 10” in height. The teacher should approve designs to be sure it is feasible.
Make patterns from newspaper for vessel. The teacher should again check the size of the patterns, making sure they will work for this project.
Slab or Coil
If slab building, roll slab to approximately 3/8-inches thick. Using template or pattern, students now cut the bottom and sides of the vessel. Have them layer slabs between approximately 20 sheets of newspaper and then wrap slabs and paper in plastic overnight. The newspaper pulls enough moisture out of the clay so that it is firm enough to build the form. Put the pieces together by scoring the edges and using slip and/or vinegar plus a coil on the inside to seal the edges. Be sure the sealed edge is smoothed with a damp sponge.
If coil building, students should first cut the shape of the base. Use a small rib to smooth the coils as they go. Use a cardboard template cut to the shape of the vessel to get the correct shape. If the vessel seems too soft, stuff newspaper inside to dry it out.
When not working on the vessels, students should keep them loosely covered in plastic so that they do not dry out and become hard.
Legs and Lids
Have students make legs and/or tops for their containers using either the slab or coil technique. Use the slip and/or vinegar technique to attach the legs or handles.
Carve Imagery
When students complete building their vessels, they should draw the design they want to carve on a piece of paper and have it approved by the teacher.
Provide students with examples of Japanese border designs and other design motifs. Encourage them to create complex, intricate, interesting designs and to stay away form the usual hearts, stars, rainbow, and sun designs.
The design should then be transferred to the sides of the vessel.
Carving is done with a variety of ceramic carving tools. Urge students to carve their designs carefully to different depths without cutting through the clay.
When the design is complete, allow pieces to dry slowly to avoid cracking.
Firing and Finishing
When thoroughly dry, bisque fire to cone 03.
Textured Alligator Glazes combined with Rub ‘n Buff® create the “faux” ancient bronze finish. Apply three coats of glaze to the bisqued vessel. Fire to cone 04.
When the piece is fired and cooled, apply Rub ‘n Buff® to the vessel with a soft cloth and gently buff to a metallic luster.
The vessels can be decorated with a variety of finishes: underglazes plus Rub ‘n Buff®, acrylic paint plus Rub ‘n Buff®, or unglazed raku fired.
Similar Lesson Plans


Food For Thought
Learn More

Twisted Vessels
Learn More

Three Cups
Learn More

Cubist Clay Portrait
Learn More
Mimbres Bowls
Learn More