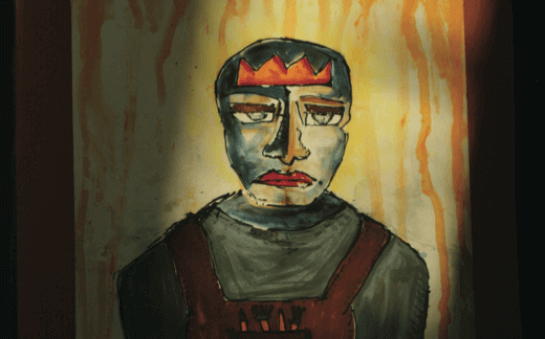
Cubist Clay Portrait

Pablo Picasso (1881-1973) is considered the most influential artist of the 20th Century. He explored many styles and techniques in painting as well as sculpture, but he is most known as being co-founder of cubism. Cubism is an art style in which the subject is broken down into several facets with several views shown simultaneously: a flattened three-dimensional form.
In this lesson, students will create a cubist style portrait using clay slabs. They will develop an understanding and appreciation for the cubist period of art with an engaging hands-on experience. They will learn to texture the clay slabs, assemble the pieces, and how to use underglazes. This is a portrait project which asks students to throw off the constraints of realism and to be creative.
Supplies List
- AMACO Low Fire Clay
- AMACO Liquid Underglazes
- AMACO Velvet Underglazes
- AMACO Low-Fire Gloss Glazes (LG)
- Texture Molds
- Wire Clay Cutter
- brent Slab Roller or Rolling Pin & Thickness Strips
- Sponge
- Fettling Knife
- Scoring Tool
- Wooden Clay Tools
- Assorted Brushes
- Sketchbook
- Vinegar

Sketch Different Perspectives
Ask your students to sketch a cubist style portrait on a piece of drawing paper. Remind them the key attributes of the cubist style and make sure they are aware that the portrait should be an abstract representation and include multiple features from multiple viewpoints. When finished with their portrait sketch have them break up each feature into a separate drawing. Example: Shape of face, nose, eyes, ears, hair etc.
Roll Slabs
Using a slab roller or rolling pins roll out a slab of AMACO® clay approximately 1/4" thick.
Transfer Drawing to Clay
Have the student lay the drawing of the individual features on top of the slab of clay and trace each shape onto the clay with a pencil or end of brush. The pressure from the pencil will transfer the outline onto the slab.
Cut Out Face
Cut Out Features
Add Texture
Apply different textures to each piece/shape of clay. Use the AMACO® Texture Slab Molds to create intricate cultural patterns or simply apply textures using found objects or other clay tools.
Layer Pieces
Score the main piece where the features will attach. Also score the back of the individual features.
Score & Attach
Brush small amount of vinegar (used instead of slip for attaching) on scored places and attach.
Compare to Image
Once all of the pieces are reassembled, each student should have a cubist style portrait that resembles their original sketch on paper but now in 3D relief made of clay.
Apply Underglaze
Next, have the students begin applying AMACO® Velvet Underglazes or AMACO® Liquid Underglazes to different areas or features. The underglazes can be applied directly onto the wet clay prior to bisque firing. Choose colors that will cause the various features and planes to recede or pop as desired.
Bisque Fire
Once completely dry, bisque fire all of the portraits to a witness Cone 04.