Dia de los Muertos (Day of the Dead) Claycrete Calaveras

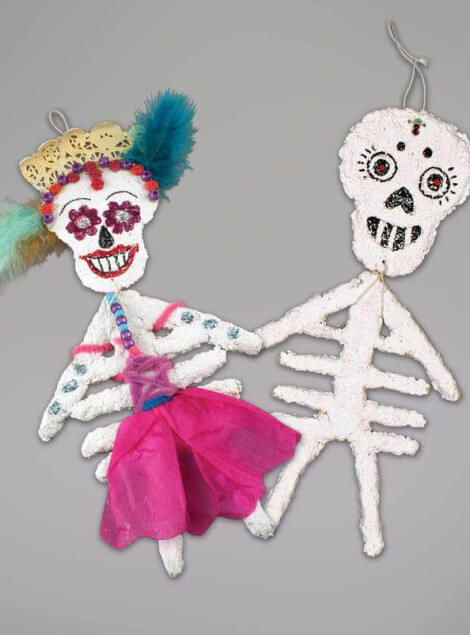
Five-hundred years ago, the Spanish landed in what is now Mexico. They discovered indigenous people practicing a 3000-year-old ritual that seemed to mock death. They tried unsuccessfully to eradicate the ritual and today it lives on as the Dia de los Muertos or Day of the Dead. The holiday has merged with Catholic theology but still maintains the basic principles of Aztec ritual, such as the use of skulls. The ritual coincides with All Saints’ Day and All Souls’ Day (November 1 and 2) and is celebrated in Mexico and in much of Central America, as well as in parts of the United States. Day of the Dead is a happy celebration with much feasting, dancing, and partying. It is meant to celebrate and welcome the spirits of dear departed loved ones. Mexicans view the afterlife as a place where identity is protected. To return to this world for the Day of the Dead, you must remain who you were. This explains the artistic tradition of making skulls, or calaveras of all types and sizes, doing ordinary day-to-day things. If Uncle Jose was a barber, he continues as a barber after death. Most homes have a fancy Day of the Dead altar that serves as a sort of landing pad, laden with objects serving as signals to guide the spirits of loved ones home. Placing a skeleton figure of a barber on an altar reaffirms to Uncle Jose, on his spiritual return, that he is not forgotten. The word “calavera" has evolved to designate the animated puppet-like skeletons associated with Dia de los Muertos. These and other handmade decorations have a long tradition in Day of the Dead celebrations. In addition, paper and papier maché are commonly used in many Mexican arts and crafts.
Supplies
- Paper Templates
- Claycrete
- White Glue
- Acrylic Paint
- Craft Sticks
- Wax Paper
- Tissue Paper
- Pipe Cleaners
- Beads
- Fabric
- Potter's Needle Tool
- String
- Glitter

Set up Armature Patterns
Design and copy paper patterns for simple flat skull shapes (heads), as well as simple flat craft stick skeletons (bodies).
Give each student a pattern for the craft stick body or armature (see photo #1), craft sticks, and white glue. Students can line up craft sticks directly on the pattern and glue them together (see photo #2). It does not matter if the sticks adhere to the pattern paper as it can be gently torn off when the glue dries. Another option is to place a piece of transparent wax paper between the pattern paper and the sticks. Younger children may need to have the body skeleton constructed by the teacher.
Apply Claycrete to Patterns
Following the instructions on the package, mix Claycrete® with water and white glue. The consistency should be such that it easily forms a mass without crumbling.
While the craft sticks are drying, or during the next class, students will begin construction of the skull or head. Place wax paper over the skull pattern, then place an appropriate dab of the Claycrete® mixture on top of the pattern. Gently spread and press the Claycrete® until it matches the pattern. Smooth the edges of the form.
Complete Claycrete Application
Place dried craft stick skeletons (bodies) on top of another piece of wax paper. Gently but firmly form Claycrete® into small cylinders about the diameter of a pencil. Press onto the “bones” of the skeleton until the entire piece is neatly covered (see photos #4 and #5). Take care to keep the bones defined.
Allow both Claycrete® calaveras forms at least 24 hours of drying time, or more if needed. They need to be fully dried and firm before proceeding.
Carefully peel the dried skulls (heads) from the wax paper. You may need to remove them in a semi-dry state in order for them to fully dry. Also remove dried skeletons (bodies) from the wax paper.
Attach Skull to Body
To join each head to its body a hole must be carefully poked into the chin area, about half an inch from the edge. A needle tool or compass tip works well for this. Thread string onto a large sturdy needle, pull the string through the hole, and tie it securely around the upper part of the spine under the arms (see photo #6). To hang each calavera, poke two more holes near the top of the head, then use a large needle to pull a piece of string through the holes. Teacher assistance may be needed with the holes and the stringing, especially with younger children.
Complete Calavera
Before finishing each calavera, students will want to consider the individual they are representing. Professions, interests, and unique characteristics should be considered. Remember that they are meant to represent someone in a very positive way. This is an opportunity for students to be really creative. Examples: the great aunt who always wore jewelry and carried a big handbag, the grandfather who never went anywhere without his dog, the eccentric cousin with a mohawk hairdo.
When fully constructed, the “naked” calaveras are very sturdy and will accommodate an array of applied media. Tempera, acrylic paint, and markers work well for facial detail or shoes, while tissue paper or fabric works well for clothing or accessories. Pipe cleaners (craft stems), as well as glue, work well for firmly attaching clothing. Other possible additions include ribbon, pom poms, googly eyes, found objects, or even accessories crafted from left over mixed Claycrete®. Yarn for hair and beads, buttons, sequins, or glitter for embellishment completes each character.
Display the completed calaveras on a bulletin board. What a great bunch of spirits have returned for Day of the Dead!
Optional
It is possible to cover both sides of the craft stick armature with Claycrete®, resulting in a two-sided figure. This may be desirable if the calaveras are to be displayed, twirling, from a ceiling. However, two sided figures tend to be a bit chunkier than a true skeleton. Care should be taken to apply the bare minimum of Claycrete® to each side.


