
How to Hand-Build a Natural Form Pot and Decorate with Amaco Semi-moist Underglaze Watercolors
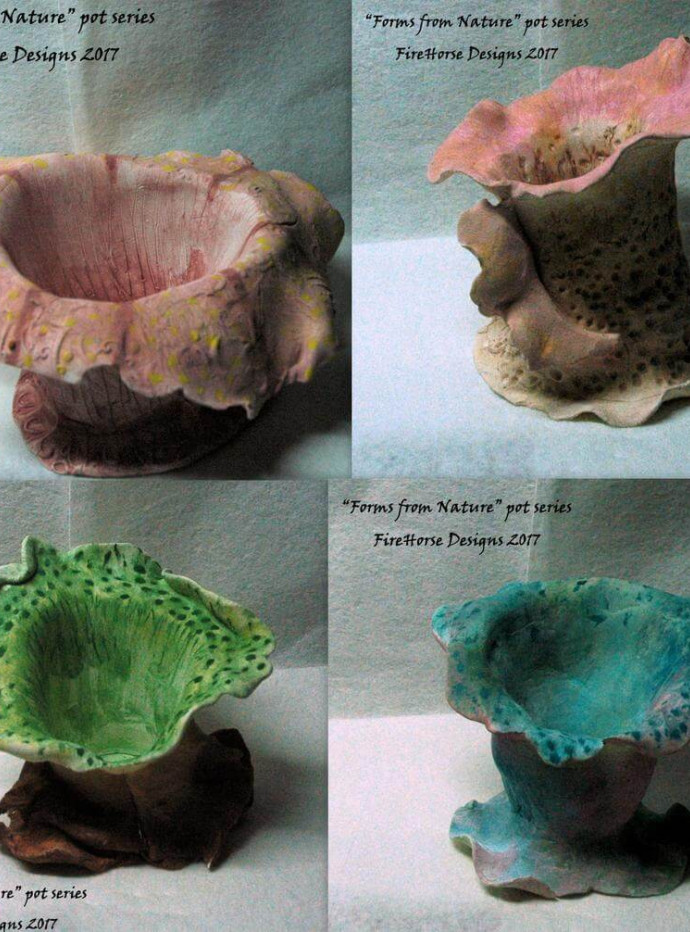
Using slab hand-building techniques you can create a lovely pot for a plant using a model from nature, such as cup corals or corpse flowers. Once built and fired to bisque you can decorate the piece using Amaco SMUGs (semi-moist underglazes) for a lovely, soft look.

Slab building your pot using a natural form
Wedge clay as needed. Use about a 1 pound ball and roll out flat using your hands or a rolling pin. I usually roll out my clay sandwiched between two sheets of plastic wrap such as Saran Wrap® to keep it from sticking to the rolling pin and surface. I usually roll out to ¼ inch (6 mm) for the pot’s base and a bit thinner for the sides and any rip-and-tear additions.
Building your pot using rip-and-tear
Cut-out the base using an Exacto knife or something similar and then cut out a sheet of clay to attach to the base. Make hashmarks in the base and attach the walls with a bit of water or slip and pinch together. Using your thumb and fingers massage the base to make “ruffles” at the base of the pot and at the top rim of the pot. If desired you can rip-and-tear some of the leftover clay sheet to make ruffles to attach down the sides of the pot.
Add drainage holes and clean your pot
Using a cleaning tool make a couple of round drainage holes in the base if you plan to use it for a plant pot. If desired make patterns in the damp clay. Allow to dry to leather hard and then clear up seams and edges. Allow to dry completely (I usually allow them to dry for about a week since the base is thick). Fire to cone 04 bisque.
SMUG (semi-moist underglaze) application to bisque
Amaco SMUGs (semi-moist underglazes) apply like watercolors. They come in a set of eight colors (and there are four sets: 108, 109, 110, and 111 with refile pans available) and can be diluted with water to the desired shade. If applied on bisque and then a transparent glaze is applied over them they will lose some intensity of color upon firing. Alternatively, they can be applied like the Amaco chalk crayons, onto unfired white glaze that has been coated with Amaco gum solution. In that process, the watercolors sink into the glaze and maintain more of their applied unfired appearance upon firing. The SMUGs can be fired either to cone 06 or cone 5/6 with no problem, although reds/pinks may fade some at higher cones. Make sure to not overfire the clay you are using i.e. earthenware clay should be bisque fired to cone 04 and then glaze fired to cone 06. Porcelain and Stoneware also bisque fire to cone 04 but glaze fire to maturity based on their rating (usually cone 5/6 or cone 8/10). Overfiring can ruin your kiln furniture since the clay body will deform or melt.
Glaze your pot and fire
Using the SMUGs with a brush and water, apply the colors as desired. You can blend them or apply dots of color etc. Once dry, apply glaze using a sponge to “pounce” it onto the piece. Do not brush it on as the colors will smear. Allow the first coat of glaze to dry and then pounce a second coat on. Allow to dry thoroughly and then glaze fire in the kiln. Glaze firing cone will be determined by the clay and glaze used. You can also use Amaco underglaze chalk crayons to sketch in veins or enhance other details prior to pouncing the glaze.
Similar Lesson Plans
Super Simple Silkscreens: Printing with Underglazes
Help is on the way. In this workshop we will use common craft store materials to make frameless silk-screens to print onto clay.
Learn More
Press & Print on Moist Clay
In this video we demo how to make stamps to print and press on moist clay slabs creating texture and color at the same time. Once your slabs are textured, we demonstrate how to build simple cylinders which can be modified to create a wide variety of forms.
Learn More

Newbie Clay
NEWBIE CLAY is a brief guide with information to help you start on your clay journey, including video links for making, firing, and glazing your ceramic projects, definitions of common terms in clay, and guidance for choosing your materials.
Learn More