
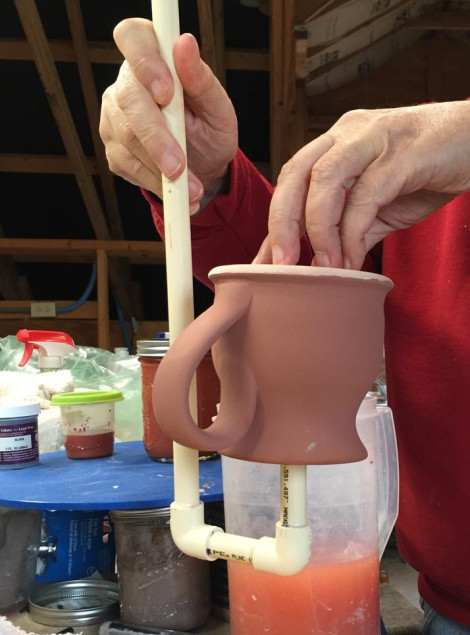
Homemade tool for dipping pots

Instead of using hands or tongs, this homemade tool will enable great control when dipping your bisqued pieces.
Materials
Gather pvc piping, pvc elbow joints, hot glue gun, an old credit card, scissors, an Amaco plastic lid, sponges, and your imagination.
Dipping the piece
Into a sieved, well-mixed glaze bucket, insert the tool into your mug with sponge resting on the inside-bottom of your mug. Hold the mug upside down, with one hand hold the taller piece of pvc and the other hand on the outside bottom of your mug.....and dip. You won't have to wax the piece because you can tightly control the depth to which you dip your piece!
Making the tool
- Decide what type of pottery you will be using the tool - this tool illustrated is my "first generation," designed for narrow necked mugs.
- Cut the pvc tubing - measurements to vary as you chose, the illustrated tool has one tube length so approximately 10 inches, one about four inches, and the third one about eight inches.
- Join the three pieces with 90 degree pvc joints and pvc glue, like a "j". See the photo.
- With scissors, cut the old credit card into a circle shape small enough to go through the opening of your mug.
- Using hot glue, glue the credit card circle to the top of the shorter leg of the "j".
- Cut your sponge to the size of the credit card circle and, using hot glue, affix the sponge to the credit card.
- Let everything cool/solidify. You're ready to use the tool.
Variations
The tool uses are limited only by your imagination. For bowls or other larger pieces, you can substitute a forty-five degree elbow or a longer "middle" piece to enable you to dip larger pieces. You can use a plastic lid and hot glue a whole sponge for greater strength to control large pieces. This is a concept. I'm sure you will all create improvements and modifications to fit your needs. Pass it forward and share your ideas with us! Best wishes to all!
Similar Lesson Plans
Super Simple Silkscreens: Printing with Underglazes
Help is on the way. In this workshop we will use common craft store materials to make frameless silk-screens to print onto clay.
Learn More
Press & Print on Moist Clay
In this video we demo how to make stamps to print and press on moist clay slabs creating texture and color at the same time. Once your slabs are textured, we demonstrate how to build simple cylinders which can be modified to create a wide variety of forms.
Learn More
Newbie Clay
NEWBIE CLAY is a brief guide with information to help you start on your clay journey, including video links for making, firing, and glazing your ceramic projects, definitions of common terms in clay, and guidance for choosing your materials.
Learn More