
Patterned Personal Platter

Using newspaper as a resist and AMACO Velvet Underglazes for color create a simple plate or platter form with a colorful and interesting surface.

Smooth the slab
Smooth the slab on both sides.
Trim around the form
Trim around the form that you will use to drape the slab into. A Chinet paper plate works well because it is sturdy with a non-slick paper surface that will not stick to the clay.
Sponge on Velvet Underglaze
This process will use 3 colors of Velvet Underglazes. Sponge on the lightest Velvet Underglaze.
Arrange paper stencils
Cut lots of newspaper shapes different sizes and shapes. Arrange the shapes on the Velvet Underglazes that are just dry to the touch.
Dip newspaper shapes into water and apply to the surface
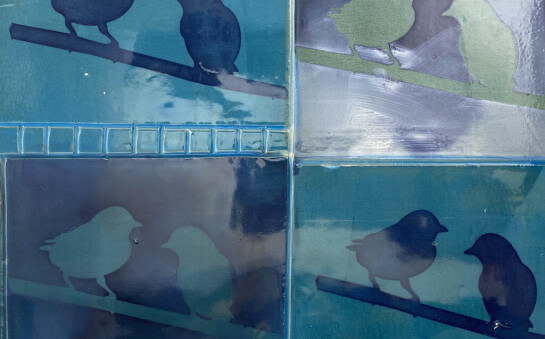
Dip the newspaper shapes into water, shake off the excess, and lay the pieces on the slab. Everywhere the newspaper is applied will remain that color throughout the process.
Sponge on the second color
While the newspaper is still moist sponge on the second color of underglaze.
Add more moist newspaper shapes
Dip newspaper shapes into water and lay on the yellow underglaze surface. Remember as you move through the process the clay should stay moist and the underglazes are just dry to the touch before applying more wet newspaper shapes. All these areas will remain the yellow color throughout the process.
Sponge on another color!
Sponge on the third, darkest color. In this project we used three colors but it could be simplified using only two colors or more complex by adding more.
Remove all the newspaper shapes
Remove all the newspaper shapes. This can be done immediately if the surface is not extremely wet.
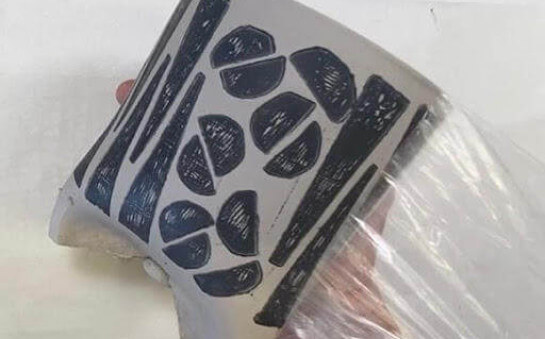
Cover the surface with plastic and drape into the form
Once the surface it just dry to the touch cover the slab with plastic wrap to protect it and lay it into the form. Center the slab over the form.
Use another plate to press the slab into the paper form
Use the same size paper plate to press the slab gently into the form. The plastic wrap will help protect the patterned surface. Once the slab is pressed into the plate removed the plastic and trim the edge so the rim will not be too large. Remember you can cut the rim into a different shape if you prefer.
Clean the rim and your ready to fire your work!
Use the plastic wrap to smooth the rim of your platter. Notice that extra colors and patterns have been added to this project. This can be done before of after the slab is pressed into the form. Additional color can be added with sponges, brushes, application (squirt) bottles - whatever works for you! The project can dry in the paper plate until it is ready to be fired. Finish your work using LG-10 Clear Glaze.
Similar Lesson Plans
Super Simple Silkscreens: Printing with Underglazes
Help is on the way. In this workshop we will use common craft store materials to make frameless silk-screens to print onto clay.
Learn More
Press & Print on Moist Clay
In this video we demo how to make stamps to print and press on moist clay slabs creating texture and color at the same time. Once your slabs are textured, we demonstrate how to build simple cylinders which can be modified to create a wide variety of forms.
Learn More
Newbie Clay
NEWBIE CLAY is a brief guide with information to help you start on your clay journey, including video links for making, firing, and glazing your ceramic projects, definitions of common terms in clay, and guidance for choosing your materials.
Learn More