Dig This! Dinosaur Bones Sculpture
The study of dinosaurs continues to be one of the most engaging activities for elementary students. Young students are fascinated with these extinct creatures. Many classroom teachers wonder why students are able to identify almost every dinosaur that ever lived, quickly transforming into mini paleontologists, but struggle to remember the current week’s list of spelling words. Why not capitalize on this extraordinary interest and create an exciting and unusual art experience that allows the students to be the experts? In this lesson, students will create a large relief sculpture from low fire clay. They will develop an understanding and appreciation for an important art form, expand their knowledge of dinosaurs and the period in which they lived, participate in an exciting and engaging inter-disciplinary hands-on experience, and provide their school with an enduring educational tool. “Dig This!” will make a lasting impression.
Supplies List
- Research and Resource Materials
- Butcher Paper
- Pencils
- Newspaper
- Fabric
- Chip Brushes (for dusting off bones)
- Terra Cotta Stoneware Clay No.77 Moist
- Hardwood Rolling Pin
- Fettling Knife

Background Preparation
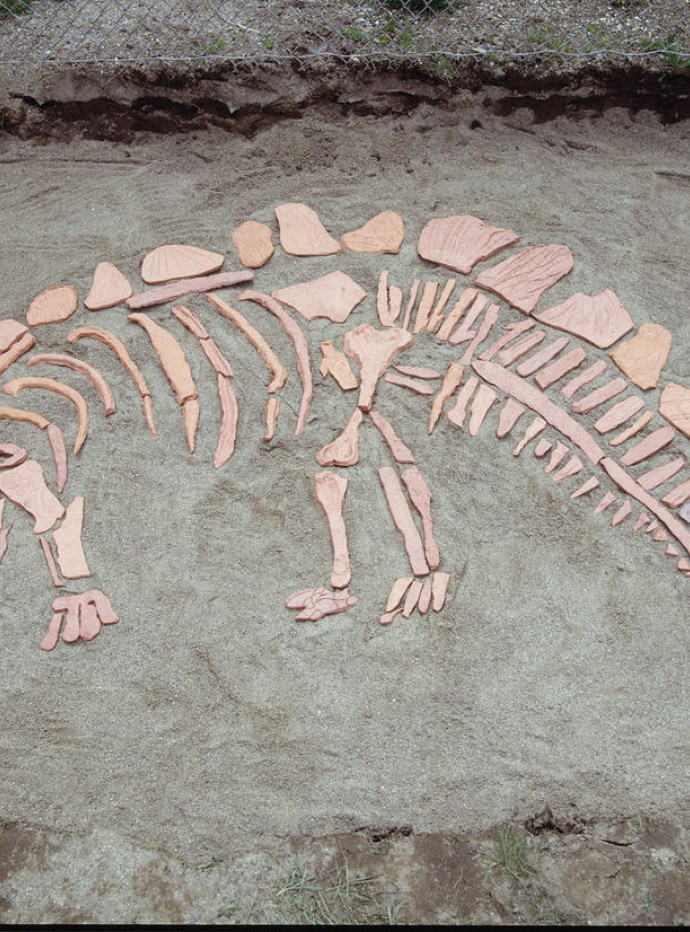
This project involved the review of dinosaurs by a fifth grade class and the creation of a 6 foot by 9 foot relief sculpture of the bones of a Stegosaurus. Second grade teachers correlated this art project with a comprehensive dinosaur unit they teach. When the sculpture was completed, it was laid out and buried in a sand pit in the school’s outdoor classroom laboratory. During the second grade’s study of dinosaurs, they went on a “dig” and discovered and dug up the bones. With the help of the fifth grade students, the bones were laid out in the correct positions, recreating the relief sculpture of the Stegosaurus.
Dinosaurs were the most successful animals to walk on this planet, dominating the earth for approximately 120 million years. The art teacher in collaboration with the classroom teacher should present an overview of dinosaurs and the period associated with each one: Cretaceous, Jurassic, and Triassic. Discuss the work of archeologists and paleontologists and what makes them different. Show drawings and photographs of recreated dinosaur models. Ask students to share resources and information with each other. Discuss the many theories regarding the extinction of dinosaurs. How did they perish--literally-- how did they fall? Why are their bones are preserved for millions of years?
Present an historical overview of various types of sculpture. Explain to students the different materials used: stone, bronze, wood, and clay. Provide students with a simple explanation of how the great masters created the world’s most famous sculptures. Show students examples of classical Greek and Roman sculptures, and works by Michelangelo, Bernini, Rodin, Degas, and Segal.
Explain that most sculptures are created in the round, or are freestanding and completely finished on all sides. Another category of sculpture is called relief sculpture, sculpture that is meant to be viewed from one side only. Relief sculptures have three-dimensional depth, but they do not occupy space independently. Most often they decorate walls or other architectural forms. There are two types of relief sculpture, low relief (sometimes called by the French name bas relief) and high relief (haut-relief, in French). A low relief projects very slightly from the surface, like the images on a coin. A high relief sculpture projects more boldly from the background. Examples of famous relief sculptures are the walls of Egyptian tombs and Lorenzo Ghiberti’s famous bronze doors for the Baptistry of the Florence Cathedral.
Explain the differences between two- and three-dimension in art. Explain that a painting is two-dimensional and that a sculpture is three dimensional because it has depth, and meant to be viewed from more than one side.
Template
If a relief sculpture of only one dinosaur is to be made, decide which one will work best for the group. In this case, Stegosaurus was chosen because classroom teachers and fifth grade artists all agreed that the large bony plates along its back makes it one of the most easily recognizable dinosaurs and would therefore be readily identified by the second grade “paleontologists.”
Using a good line drawing of the skeleton of the dinosaur as a guide, students should work together to draw an enlarged skeleton on butcher paper. The Stegosaurus was drawn on a 6 foot by 9 foot paper.
This enlarged drawing should be traced or copied exactly so that two drawings are available. The first drawing will be cut up to use as templates; the second drawing will be the pattern guide on which the students will be able to lay out the fired bones.
Each bone of both drawings should be categorized by group (ribs, neck bones, upper tail, lower tail, plates, front legs, back legs, head, etc.) and numbered, i.e. #1 Rib, #2 Rib,…; #1 Plate, #2 Plate,…..; #1 Front Leg, #2 Front Leg, …; and so on.
Cut out bones of one drawing to use as templates.
Cut Out Bones
Using AMACO® #77M Terra Cotta clay with grog, students should pound or roll out necessary amounts of clay on the fabric to a thickness of approximately 3/4″ to 1″.
Lay a template on clay and, using a needle tool, cut around the template. Peel off template.
Texture and Mark
Using fingers, pencils, and assorted tools, create texture, ridges, grooves, and notches in the bones for a realistic effect.
Incise with pencil or needle tool the number and group name of the bone on the back.
Lay paper template gently back on clay bone and place bone on racks or in cabinet to dry.
Continue process for each bone in dinosaur skeleton.
Firing
After all bones are completely dry, peel templates off (and save), and bisque fire bones once to cone 05.
When bones are fired, match templates to bones and lay bones out in their appropriate positions on first drawing.
Bury and Dig the Bones
After firing, bury in a sand pit or dirt area and allow younger students to "discover" the "fossil". Either before, during, or after this lesson, arrange a trip to the local museum that features dinosaurs.
Possible Suggestions:
After the “dig” is completed, arranged with the school’s administration to hang the dinosaur relief sculpture( s) permanently on a wall in the school.
Save the bones and the lay out drawing to use for “digs” with upcoming classes.
Working with the classroom teachers, have students do research on a particular dinosaur, the work of archeologists or paleontologists, or the ages of dinosaurs. Students can prepare and present reports on their research complete with drawings, charts, and maps.