
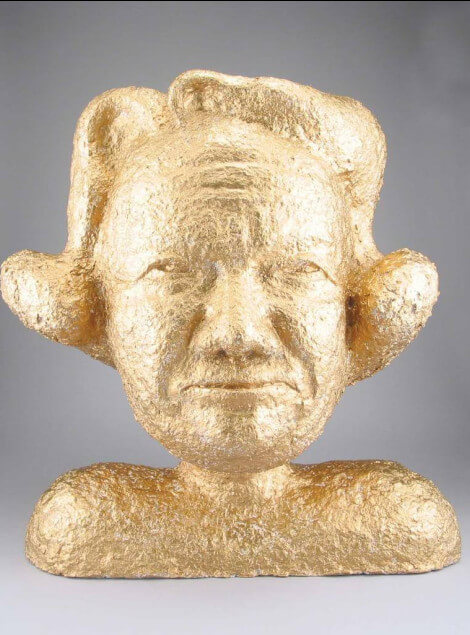
Sculptural Heads in Sculptamold

A Lesson in Creating Life-size Heads with Sculptamold®
The human figure has been a basic subject of sculpture since its earliest beginnings. Each human face and figure is distinct, and artists throughout history have always been fascinated by this uniqueness. In this lesson, students will create sculptures of a human head using Sculptamold®. Students will have the opportunity to develop an understanding and appreciation for an important art form, to learn the intricacies and individualities of the human face, to participate in a fun and engaging hands-on experience, and to explore the feelings and emotions that are displayed in the human face.
Supplies
- SCULPTAMOLD
- Water
- Newspaper
- Masking Tape
- Wooden Base
- Mixing Bucket
- Measuring Cup
- Towel
- Flexible Metal Scraper
- Pencils
- Dust Mask
- Latex Gloves
- Scissors
- Paintbrushes
- #4 Sculptor's Mesh Aluminum
Background Preparation
The teacher should present a brief historical overview of portraits. Explain to students that a portrait is a type of art that shows the face of a person; why portraits were painted; what portraits told about the person painted; and how photographs have now replaced traditional painted portraits. Show students as many examples of portraits as possible, including artists’ self-portraits — Ghirlandaio’s “Old Man and His Grandson,” Edward Munch’s “The Scream,” Van Gogh’s “Self-Portrait” and “Self-Portrait with Bandaged Ear,” among others.
The teacher should present a brief historical overview of sculpture. Explain to students the different types of sculpture: stone, bronze, wood, clay, etc. Show students examples of classical Greek and Roman sculptures and sculptures by Michelangelo, Bernini, Rodin, Degas, and Segal. Explain to students that sculptors spend many years studying human anatomy in order to create realistic sculptures.
Show other types of three-dimensional faces and figures such as African masks and Egyptian mummy cases. Discuss with students how all these different art forms depict the human face. Discuss how they are similar and how they are different. Help students to understand the importance of showing feelings and emotions when portraying the human face.
Explain to students about the shape, structure, and proportion of the human face and head. This project asks students to create sculptures of heads that are not necessarily real or represent any individual.
Armature
Create an armature appropriate in scale. For a life-size bust, the base should be approximately 4″ x 12″, with a vertical support that is 12″ to 15″ high. Place each armature on newspaper or plastic to protect work surface.
Cover Armature with Paper
Have students crumple and build up newspaper onto armature using masking tape to hold in place. Make as dense/tight as possible so that it doesn’t give much when you add the Sculptamold®. Build shoulders, neck, and head, taking into consideration the overall shape intended.
Mixing Sculptamold
Shake closed Sculptamold® bag to thoroughly mix product before using as settling may occur in shipping. Provide each student with their own mixing bucket. Pour 1 cup of tepid water into mixing bucket and then with a separate cup add 2 to 3 cups of Sculptamold®. Students should mix this together, stirring by hand. The consistency should be lumpy like soft, sticky, baking dough (or thick oatmeal). Your students can add small amounts of water or Sculptamold® to achieve the desired consistency. A wetter mixture, will have a slightly longer working time, but a firmer mixture is easier to work with. The Sculptamold® will begin to set in 15 to 20 minutes so do not mix large amounts at one time.
Applying Sculptamold to Chest and Shoulders
Beginning at the base, the students should apply small “patties” of the mixture onto the form. It is easier to build the shoulders and neck before attempting to make the head. Overlap and smooth out each patty as it is added. As the Sculptamold® begins to set, you will be able to push and shift the wall without creating indentations. Remind your students not to worry about the details yet.
Apply Sculptamold to Back and Sides of Head
Once the shoulders and neck are stiff enough, have your students lean their piece forward onto crumpled newspaper so that the back of the head is almost horizontal. Mix another same size batch of Sculptamold® to create the back of the head using the same method of patting and joining. Build up from the neck and cover as much of the sides as you can reach.
Face
Allow the piece to set up until the Sculptamold® can hold its shape before flipping to form the front of the head. Mix more Sculptamold® and with the head now laying back, add patties to the existing “shell” to form the face and completely enclose the head. Have students evaluate where the nose and chin will be and build up those areas with wadded newspaper or shaped Wireform® strips.
Finishing and Refining Face
Use the masking tape again to hold these in place. Also build up any other areas that will be raised or bigger so that the finished piece will be lighter than if built up with Sculptamold® only. Remember to indent lower areas such as the eye sockets and mouth opening while the Sculptamold® is still flexible. Have your students focus on overall shape, proportion, and volume before defining the features.
Hair
Once the general features are in place, focus on forming the hair. Remember that hair creates an overall shape. Don’t worry about the texture until you’ve formed the shape of the hairstyle. You can build the hair up by cutting and shaping strips of Wireform® and pinning them into the Sculptamold®. Then you can add more soft Sculptamold® to cover the wire and to refine the shape and create the texture.
Refining Features
o not attempt to refine one shape until all the parts are formed and their placement and proportions have been determined. Once the overall shape of the head is “right,” begin building the nose, lips, chin, forehead, and cheeks. Try exaggerating the features for a more dynamic effect— remember nostrils, bags under the eyes, etc.
Surface Texture
Simple tools like a spoon, pencil, and fine paintbrush can be used to refine details in the soft Sculptamold®. More Scuptamold® can be added even after the head is dry. You can also scrape or carve the Sculptamold® to achieve the desired shapes.
If a smoother surface is desired, the “lumpy” Sculptamold® surface can be burnished when still moist or filled in with a thin mixture of plaster and water.
Painting
Wait until your sculpture is completely dry before painting (about four days). Use any paint suitable for a porous surface and decide whether you want your work multi-colored or one solid color. Is it a realistic sculpture or stylized? Vary colors to create areas of interest and texture. Remember that flesh color varies and isn’t solid or flat.
Cleanup Advice
Avoid pouring Sculptamold® down your drains. Allow to stiffen enough that you can scrape buckets and tools and dispose of in the trash. If rinsing is necessary, allow waste to settle, then pour off the water and throw clumps in trash.
Other Options or Variations
a. Use metal rods, heavy gauge wire, or plumbing and attach firmly to wooden base to create the armature.
b. Use acrylics to apply a variety of colors or, for a “bronze” look use AMACO® Antique Gold Brush ‘n Leaf® (76631L) with AMACO® Rub ‘n Buff® over it (20 colors available).
c. Glue on other materials to create hair, eyes, or appendages (for example, wool for hair, create earrings, fabric for clothes).
d. Create a base or pedestal for the bust. This could be a classical black or gray box, or a mixed media environment to put your piece in context.
Similar Lesson Plans
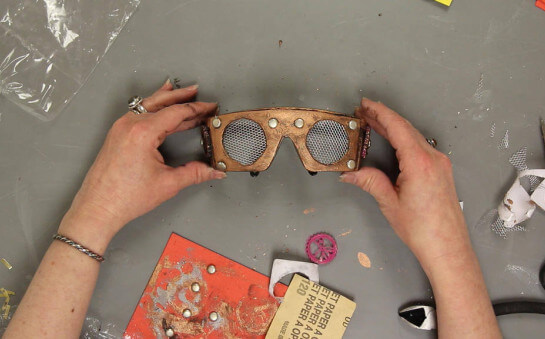
Steampunk Safety Goggles
Convert a pair of standard safety glasses into steampunk goggles. Step-by-step instructions and video.
Learn More
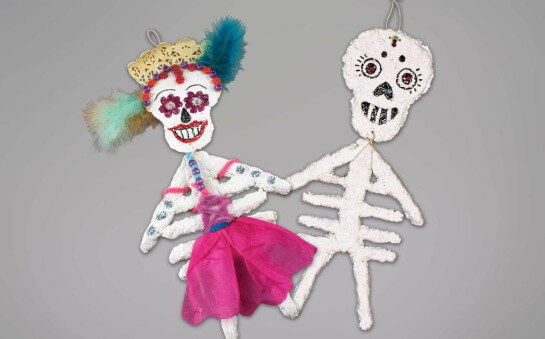
Dia de los Muertos (Day of the Dead) Claycrete Calaveras
Five-hundred years ago, the Spanish landed in what is now Mexico. They discovered indigenous people practicing a 3000-year-old ritual that seemed to mock death.
Learn More
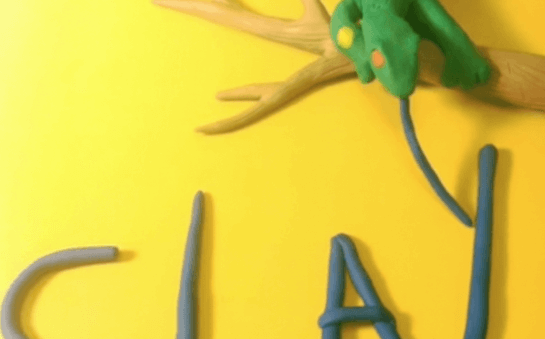
Clay Animation
Clay animation combines the high tech equipment kids love to use with their ageless, timeless love for the tactile qualities of clay. It encourages teamwork and gives students the opportunity to learn through the hands-on process of creating.
Learn More