
Japanese Garden Lantern
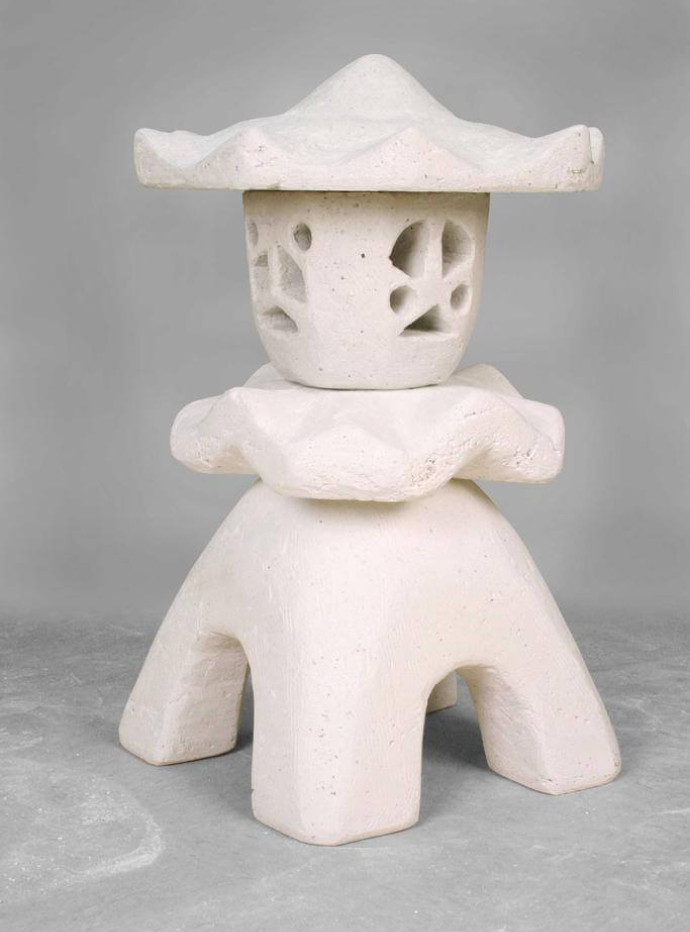
Pagodas originated in ancient China many centuries ago and were inspired by the Indian Stupa. A Stupa is a bell-shaped monument that is used to house relics or sacred Buddhist scriptures. Japanese stone garden lanterns reflect this ancient Pagoda design, which consists of a base pedestal, a platform for the firebox, the firebox, and the roof. Japanese lanterns were originally placed around Buddhist temples and shrines. Later they were introduced by tea masters to guide guests through gardens to the tea ceremonies that were held in the evenings.
Today, garden lanterns are not only used in the Orient but have become part of our western culture. We use these beautiful natural looking structures as decorative accents for patio entrances, garden pond areas, to add harmony and balance or as a focal point in a specific spot in a flower garden. A candle or oil lamp can be placed in the firebox as a decorative element or to give light in a walkway. Simple and yet seemingly divine, they add a mystic quality, spirituality and harmony to the home and garden.
AMACO Crea-stone is a lightweight casting/sculpting material that has a granite look and texture when it is hard. Crea-stone mixes with water to achieve a thick paste like cement mix. Pour this paste into available objects to create the Japanese Garden Lantern. Once the paste starts to set up you can take it out of the cardboard box/mold and start doing any needed carving to enhance the cast shape. Usually this can be done after letting it harden for about 18 hours of pouring. At that point, although hard, the piece can easily be carved with a knife. As you are carving, Crea-stone is going through a chemical reaction and becoming harder all the time. Therefore, try to keep it wet with water, but also work fast. As you progress you will have to change your carving tools accordingly from a knife to a hammer and chisel. Try to cast and finish each section of the lantern at a time before it gets to be too hard and chose a casting box/mold as close to the finished shape as possible. This will reduce the need to do too much carving.
Mix enough material only for the part of the lantern that you are working on at the time. Try not to mix more than you need. If you are a little bit short on the amount, you can readily do another small mix to finish the section. Before you start, wear a NIOSH approved mask for dust and mist and make sure to wear vinyl gloves. Crea-stone is an alkaline material and will otherwise irritate your hands.
Supplies
- Crea-Stone White
- Latex/ Vinyl Gloves
- Mold Maker's Knife
- Hammer
- Chisel
- Rasp
- Utility Knife
- Ruler
- Drill with 1/2" Bit
- Metal Rod 8" Long
- Plastic Bucket (9.5" wide)
- Cottage Cheese Container
- 16"x16"x12" Box
- 16"x16"x8" Box
- 14"x14"x6" Box
- 4 pieces of 16"x16" pieces of cardboard
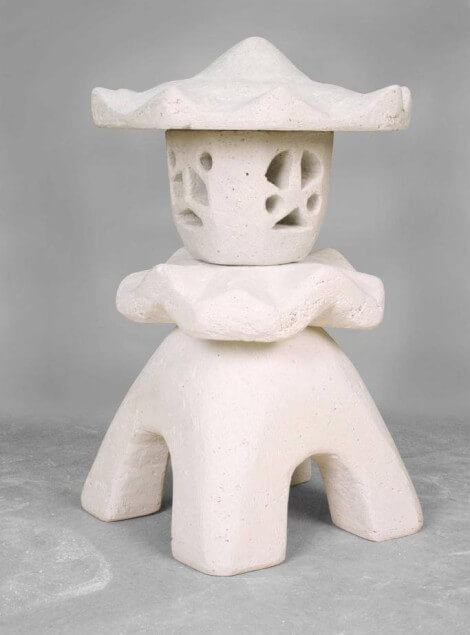
Base Pedestal: Box
Start by building a mold for the base pedestal using the 16” x 16” x 11 1/2” box. Place two of the 16” x 16” x 12” cardboard pieces on opposite sides inside the box to form the first two sides of the upside-down pyramid. Measure the area at the bottom between them and cut the slanted shapes of the other two sides of the pyramid. Place them inside the box thus forming the 4 sides of the upside-down pyramid. Tape all corners.
Fill With Creastone
Pour Crea-stone into the mixing container. Add water slowly and mix thoroughly. Be careful not to add too much water as the paste will tend to want to flow and level in areas where you do not have a molding material to restrain it. The mix should be just wet but not soupy. As you proceed with this project do not mix too much Crea-stone at a time. If you do not have enough paste for the section of the piece you can always mix some more and add to it. Crea-stone does not set up instantaneously. Spread some Crea-stone paste in the bottom of the box, and then place the plastic bucket on top of the paste in the center of the box. Make sure that the rim of the bucket is at the same height as the rim of the box, then add more Crea-stone paste to build the four legs of the base pedestal.
Remove Bucket
Let Crea-stone start setting up for about 18 hours. Once it is stiff, pull the plastic bucket out.
Remove Base from Box
Turn the box upside down and pull away the box from the cast shape.Save the bucket to use again.
Shape Base
Leave a center 6” x 6” flat area on the top of the pedestal. When you are done use the rasp all over the Base Pedestal to smooth the shape and give it a sculptured markings with the rasp.
Create Platform for Firebox
Leave a center 6” x 6” flat area on the top of the pedestal. When you are done use the rasp all over the Base Pedestal to smooth the shape and give it a sculptured markings with the rasp.
Shape Platform
Leave the cast piece for about 18 hours like you did with the base pedestal, then remove it from the box and carve the corners and the ridges strait. You will need to carve on the bottom too, to form the flowing up and down wavy shape of the platform. When you are satisfied with the shape use the rasp to even out and smooth the surface. Also the rasp will leave a nice texture simulating a chiseled form.
Create Firebox
You will need the plastic bucket from step #2 plus a smaller plastic bucket to mold the firebox. For easier release of the form you can brush dish soap on the inside of the bucket and on the outside of the small container. Mix enough Crea-stone with water to the right consistency and spread the paste in the bottom of the bucket. Place the small container over the paste in the center of the bucket, making sure the rim of both containers is at the same level. Use a piece of wood or ruler on top to make sure. Fill the space around the small container to the top of the bucket. Leave the ruler or place a sheet of plywood over the bucket and put some weight in order to keep everything level until it sets up.
Remove Firebox Form and Draw Designs
When Crea-stone has set up, remove it from the bucket and remove the small container from inside the casting. If the bucket is square like the one used in this project, round up the corners with the knife. If you are using a round bucket, carve the outside, making it into a more or less 4-sided shape, but do not leave sharp corners. Draw the openings that you want in the firebox with a pencil.
Carve Firebox
Using the drill with the 1/2” drill bit, drill holes in the openings, and then using the knife you can carve them further and shape them according to your drawn design. When done use the rasp again to smooth out any irregularities and texture it with a chiseled like surface. Make sure the bottom of the firebox is also 6” x 6” wide to match the platform and the pedestal.
Create Roof
You will use the 16” x 16” x 8” box for the roof. First, cut 3 layers of cardboard to fit the bottom of the box. Cut a hole in the middle the same size as the rim of the small container used in the Firebox, and place them in the bottom of the box. You can also cut a ½” strip from the small container that you used for the firebox and insert it in the hole that you cut. The hole in the center will be the plug that will fit as a cover for the firebox. Build corners out of cardboard to cut on carving time and effort. Mark the inside wall of the box with a line about 2” from the bottom. This will be your thickness limit.
Mix enough Crea-stone with water to the right consistency as you did in step #2. Fill the plug in the center then spread the paste to the thickness line, let the paste stiffen for 10 minutes then build a two levels hill in the center of the box and pointed ridges on the corners. When the Crea-stone has set up, remove it from the box and carve the surface of the ridges and top into a nice shape, then go over all irregularities with the rasp and smooth it out to repeat the chiseled like surface you did on the other pieces.
Prepare for Assembly
Now you have all 4 parts ready. Mark the center on the base pedestal top and drill a hole the same thickness as the rod that you have prepared. The hole depth does not need to be deeper that 4”, just make sure not to drill the hole all the way threw the bottom of the base pedestal. You also need to drill the same size hole through the center of the firebox platform and one in the center of the bottom of the firebox. Lantern Assembly
Place the metal rod in the base pedestal. It will be sticking out for the most part.
Assemble
Place the firebox platform on top of the base pedestal by sliding it through the hole in the center. Place the firebox on top of the firebox platform by sliding it through the hole in the bottom. If the metal rod is sticking inside the firebox, cut it so it would be flat with the inside floor of the firebox, so you can place a candle of oil lamp if you want to.
Lighting and Display
Place the roof on top of the firebox by inserting the bottom plug into the top of the firebox. Now your lantern is complete. Let the natural elements and the concept of balance contribute to the harmonious balance of your home and surrounding area by planning your garden and placing this lantern where it is meaningful to you.
Similar Lesson Plans
Steampunk Safety Goggles
Convert a pair of standard safety glasses into steampunk goggles. Step-by-step instructions and video.
Learn More

Dia de los Muertos (Day of the Dead) Claycrete Calaveras
Five-hundred years ago, the Spanish landed in what is now Mexico. They discovered indigenous people practicing a 3000-year-old ritual that seemed to mock death.
Learn More
Clay Animation
Clay animation combines the high tech equipment kids love to use with their ageless, timeless love for the tactile qualities of clay. It encourages teamwork and gives students the opportunity to learn through the hands-on process of creating.
Learn More