
Clay Tips & Tricks: Slab Plates with Reusable Stencils

Follow along in our latest Tips & Tricks video as we walk you through building a slab plate using a hump mold, the versatile uses of Velvet Underglazes as well as creating your own reusable plastic stencils.
Have video suggestions? Let us know!
Supplies
- LM-10 Transparent Matte
- Underglaze Applicator
- Glaze Brushes
- Velvet Underglaze
- Plastic Sheeting
- Scissors or Exacto Knife
- Glue Stick
- Paper
- Fettling Knife
- Scoring Tool
- 10 3/4" Salad Plate Drape Mold
- Rubber Rib
- Clay

Building a Slab Plate using a Hump Mold
Follow along in this video as we walk you through building a slab plate using a hump mold!
Materials Needed:
- Clay (We used AMACO Sedona Red Clay No. 67)
- Rubber Rib
- Hump Mold
- Scoring Tools
- Fettling Knife
Steps:
- Roll out a slab & smooth with a rubber rib.
- Cut out a circle.
- Place slab over the hump mold.
- Use a rib to smooth & compress the slab down to the mold.
- Score & slip a circle then attach a coil for a foot.
- Use an exacto knife to create a flat edge for the foot. Allow to sit until leather hard.
Using Velvet Underglazes with Reusable Plastic Stencils
Follow along in this video as we demonstrate how to create your own reusable plastic stencils and decorate with Velvet Underglaze!
Stencil Materials:
- Paper
- Glue Stick
- Scissors or Exacto Knife
- Plastic Sheeting
Stencil Steps:
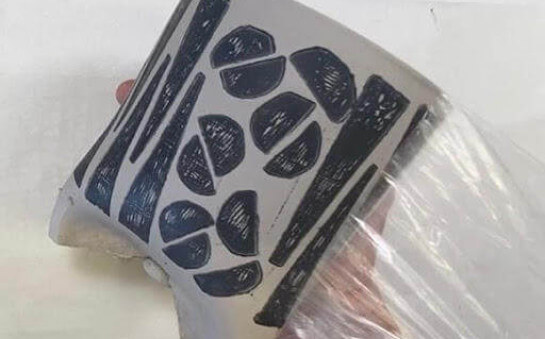
- Print or draw a design on paper.
- Use a glue stick to attach the paper to the plastic sheeting.
- Use sharp scissors or an exacto blade to cut out the stencil.
- PRO TIP: Remove plastic from paper & you now have a reusable stencil.
Underglaze Materials:
- Underglaze x 2 colors (We used AMACO Velvet Underglazes: V-332 Teal Blue and V-354 Leaf Green)
- Paint Brushes
- Underglaze Applicator (We filled ours with AMACO Velvet Underglaze V-370 Velour Black)
Underglaze Steps:
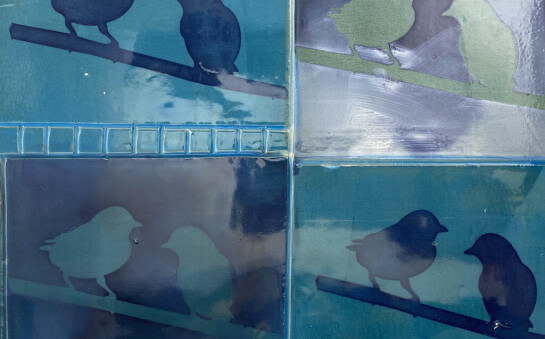
- Paint on two even coats of V-332 Teal Blue as a base.
- After the underglaze is firm, use water to help the stencil stick to the plate.
- Paint over the stencil with two even coats of V-354 Leaf Green.
- Draw a design with V-370 Velour Black on top of the plate using an underglaze applicator.
- Use an exacto knife to remove the plastic stencil once the underglaze is dry.
- After bisque firing, glaze with LM-10 for a nice, satin surface and fire to Cone 05. Rinse the stencils and repeat!
Similar Lesson Plans
Super Simple Silkscreens: Printing with Underglazes
Help is on the way. In this workshop we will use common craft store materials to make frameless silk-screens to print onto clay.
Learn More
Press & Print on Moist Clay
In this video we demo how to make stamps to print and press on moist clay slabs creating texture and color at the same time. Once your slabs are textured, we demonstrate how to build simple cylinders which can be modified to create a wide variety of forms.
Learn More
Newbie Clay
NEWBIE CLAY is a brief guide with information to help you start on your clay journey, including video links for making, firing, and glazing your ceramic projects, definitions of common terms in clay, and guidance for choosing your materials.
Learn More